You've picked the species. You've picked the depth. You know the length. You've got a set of custom floating shelves on the way. And now you're standing in front of a wall with a pencil, a level, and absolutely no idea how far apart they should be.
So you eyeball it. You hold one shelf up, step back, squint, move it two inches higher, step back again, and eventually just drill where you think it looks right. Then you live with 14" of dead space between shelves that should have been 10", or a gap so tight you can't fit a hardcover in without tipping it sideways.
Spacing is the part of a shelf install that people think about last and regret first. Here's how to get it right before you put a single hole in the wall.
The Rule That Applies to Every Setup
Start with what's going on the shelf, not with the wall.
Measure the tallest item you plan to put on each shelf. Add 2" to 3" above that. That's your minimum spacing between the top of one shelf and the bottom of the shelf above it. The extra inches give you breathing room so things don't look crammed in and so you can actually get items on and off the shelf without performing surgery.
That's the whole framework. Everything else is just applying it to specific rooms and use cases. The spacing that works for a kitchen with stacked bowls is different from a living room with books, which is different from a nursery with picture books and stuffed animals. But the method is the same: measure what's going on the shelf, add a buffer, and work from there.
Spacing by Room and Use Case
Kitchen: This is where spacing precision matters most because kitchen items come in wildly different heights. A stack of dinner plates is 6"-8" tall. A row of oils and vinegars might be 12". A stand mixer is 14"+. For most kitchen floating shelves, 12" to 14" between shelves handles the majority of items. If you're dedicating a shelf specifically to small appliances, give it 16" and let everything else tighten up.
Books: Paperbacks need about 8"-9" of clearance. Standard hardcovers need 10"-11". Art books and large format books need 12"-14". If you're building a wall of floating bookshelves, measure your tallest books first and build the spacing around those. A common mistake is spacing every shelf equally when your collection has a mix of sizes. It's better to vary the spacing: tighter gaps for paperback rows, wider gaps where the oversized books live.
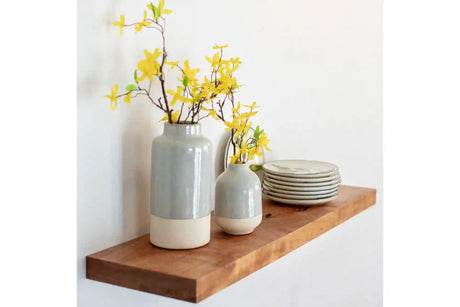
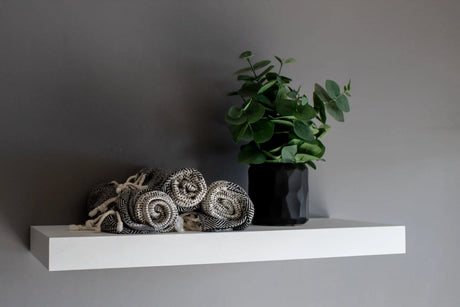
Living room display: This depends entirely on what you're displaying. Framed photos, small plants, and decorative objects are usually 8"-12" tall. 10" to 12" between shelves keeps things proportional without wasting wall space. If you're staggering shelves at different heights rather than stacking them vertically, spacing becomes more about visual balance than object fit.
Bathroom: Bathroom floating shelves holding toiletries, small plants, and folded towels typically need 10" to 12" between shelves. Towels stacked three or four high fit comfortably in a 10" gap. If you're storing taller bottles (shampoo, sprays), bump it to 12".
Nursery: Nursery wall shelves used for kids' books need tighter spacing than adult bookshelves since picture books are shorter. 8" to 10" works well and keeps everything within reach for little hands. For display items (stuffed animals, photos, small decor), 10" to 12" gives enough room without the shelf looking bare.
Entryway: Entryway floating shelves often hold keys, mail, a small plant, and maybe a basket. If you're doing two shelves by the door, 10" to 12" between them handles most of these items. If you're adding hooks below the bottom shelf for bags or coats, account for the hang length when deciding how low that shelf goes.
Laundry room: Detergent bottles, spray bottles, and cleaning supplies run tall. Laundry room shelving generally needs 14" to 16" between shelves to accommodate the taller containers without cramming.
How Far From the Ceiling?

The top shelf should sit at least 8" to 12" below the ceiling. Anything closer than 8" creates a gap too narrow to use but too visible to ignore. It ends up collecting dust and looking like you ran out of wall.
If the gap between the ceiling and your top shelf is going to be 6" or less, push the shelf up to within 2" of the ceiling and treat it as a near-ceiling display shelf. That reads as intentional. A 4"-6" gap reads as a miscalculation.
How Low Should the Bottom Shelf Go?
This depends on the room and what's below the shelf.
Above furniture (desk, sofa, counter): The bottom shelf should sit 18" to 24" above the surface of the furniture below it. This gives enough clearance for items on the furniture (a lamp, a monitor, a row of back-of-counter items) without the shelf feeling disconnected from the setup. For specific guidance on shelf height above a sofa, the height guide in the floating shelves above couch collection covers that in detail.

Standalone wall (no furniture below): A common starting point is 48" to 60" from the floor for the bottom shelf. This puts it at roughly eye level for most people, which is the natural display height. Below 48" starts to feel low unless you're intentionally building a floor-to-ceiling run.
Floor-to-ceiling runs: If you're replacing a bookcase with a vertical column of shelves, the bottom shelf can go as low as 12" to 16" from the floor. This only works when the full column reads as one cohesive unit. A single shelf at 16" from the floor looks like it fell off the wall.

Equal Spacing vs. Varied Spacing
Equal spacing between every shelf creates a clean, uniform, built-in look. It works well for kitchens, pantries, and anywhere the goal is order and consistency.
Varied spacing creates a more dynamic, curated feel. It works well for living rooms, bedrooms, and display-focused walls where different objects need different amounts of room.
Neither is wrong. The mistake is defaulting to equal spacing when your items are different heights, or varying the spacing randomly without a reason. Let the objects drive the decision.
Planning a Multi-Shelf Layout
If you're ordering three or more shelves for the same wall, plan the entire layout on paper before you order. Here's a simple process:
Measure the total wall height from where your bottom shelf will sit to where your top shelf will go. List every item going on each shelf and measure the tallest one per shelf. Add your buffer (2"-3") to each measurement. Add up all the spacing plus the shelf thickness (1.8" per shelf) and see if it fits the available height. Adjust spacing up or down until everything fits cleanly.
This takes ten minutes with a tape measure and a notepad. It saves you from the "I have four shelves and only three fit" problem that happens when people order first and measure second.
For length guidance on each individual shelf, Size Matters covers how to choose the right length for your wall. For depth guidance, read about choosing the right shelf depth before you finalize your order.

The Weight Question
Spacing affects perceived weight capacity even when actual capacity stays the same. A shelf with 16" of open space above it looks like it can hold more than a shelf with 8" above it, even though the Hovr bracket doesn't care either way. It's 150 lbs per stud regardless.
If you're loading shelves with genuinely heavy items (cast iron, full book rows, equipment), the spacing won't change the capacity, but it will change how easy it is to load and unload the shelf. Tight spacing with heavy objects means you're muscling things in at an angle. Give heavy-use shelves an extra inch or two of clearance and your future self will appreciate it.
For the full breakdown on load capacity, read about what causes shelves to sag.
Try It Before You Drill It
If you're unsure about your layout, grab a roll of painter's tape before you grab the drill. Tape out the full shelf layout on the wall: mark the length of each shelf, the spacing between them, and the height of the bottom and top shelves. Step back and live with it for a day or two.
Painter's tape is the cheapest way to test whether your spacing actually works in the room. What looked right on paper sometimes feels too tight or too spread out once it's on the wall at scale. You might realize the bottom shelf needs to drop 4" to clear a lamp, or that the gap between shelves two and three is swallowing the wall. Better to move tape than to patch drywall.
I recommend this to customers all the time, especially on multi-shelf layouts where the spacing between each shelf might not be equal. Tape it out, photograph it, and if you want a second opinion, send me the photo before you order.
Before You Drill
Quick checklist:
- Measure your tallest items per shelf, add 2"-3" buffer
- Plan the full layout on paper before touching the wall
- Keep 8"-12" between the top shelf and the ceiling
- Keep 18"-24" between the bottom shelf and any furniture below
- Vary spacing intentionally if your items are different heights
- Account for shelf thickness (1.8") in your total height calculations
Every shelf is custom wood floating shelves by default: made to your exact dimensions, 12" to 72" long, 6" to 12" deep, seven species. If you're planning a multi-shelf layout and want a second opinion on spacing before you order, reach out and I'll help you map it out.